
Hey crafty friends!
I’m excited to be participating in another Waffle Flower Link Party! This month’s party – and my card today – feature products from Sneak Peek Club Kit #06!
A quick reminder: the Sneak Peek Club provides Club Members with a super fun monthly kit of Waffle Flower products. Members get the products about a month earlier than they are released to everyone else! So, if you’re interested in being a Club Member, you can sign up here: Club
Like previous months, Waffle Flower is generously providing a GIVEAWAY* to one of my blog readers (that would be YOU) if you comment on this blog post by June 30th. The GIVEAWAY* is Kit #06 – the same kit I used to make my card for today! Winners are picked at random and will be announced on Waffle Flower’s Link Party post! *the GIVEAWAY can only be shipped to the US.
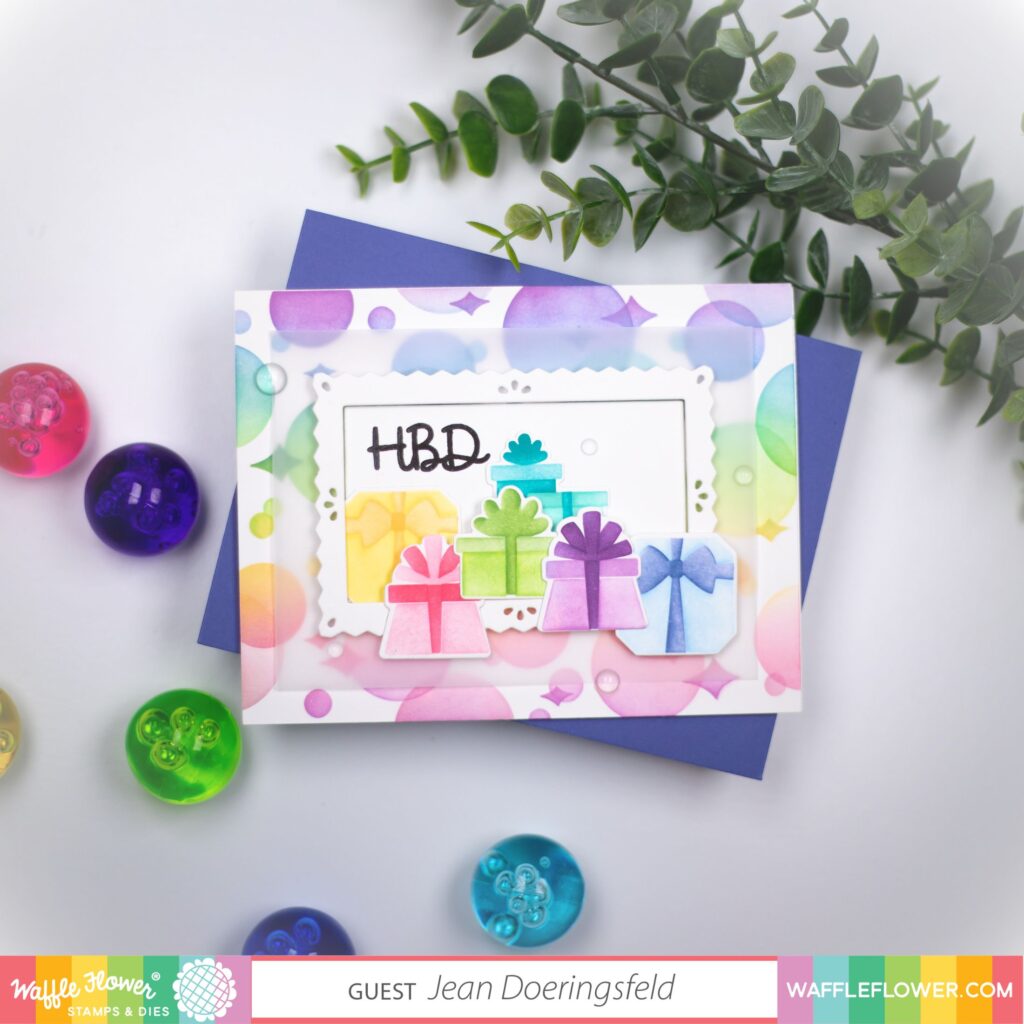
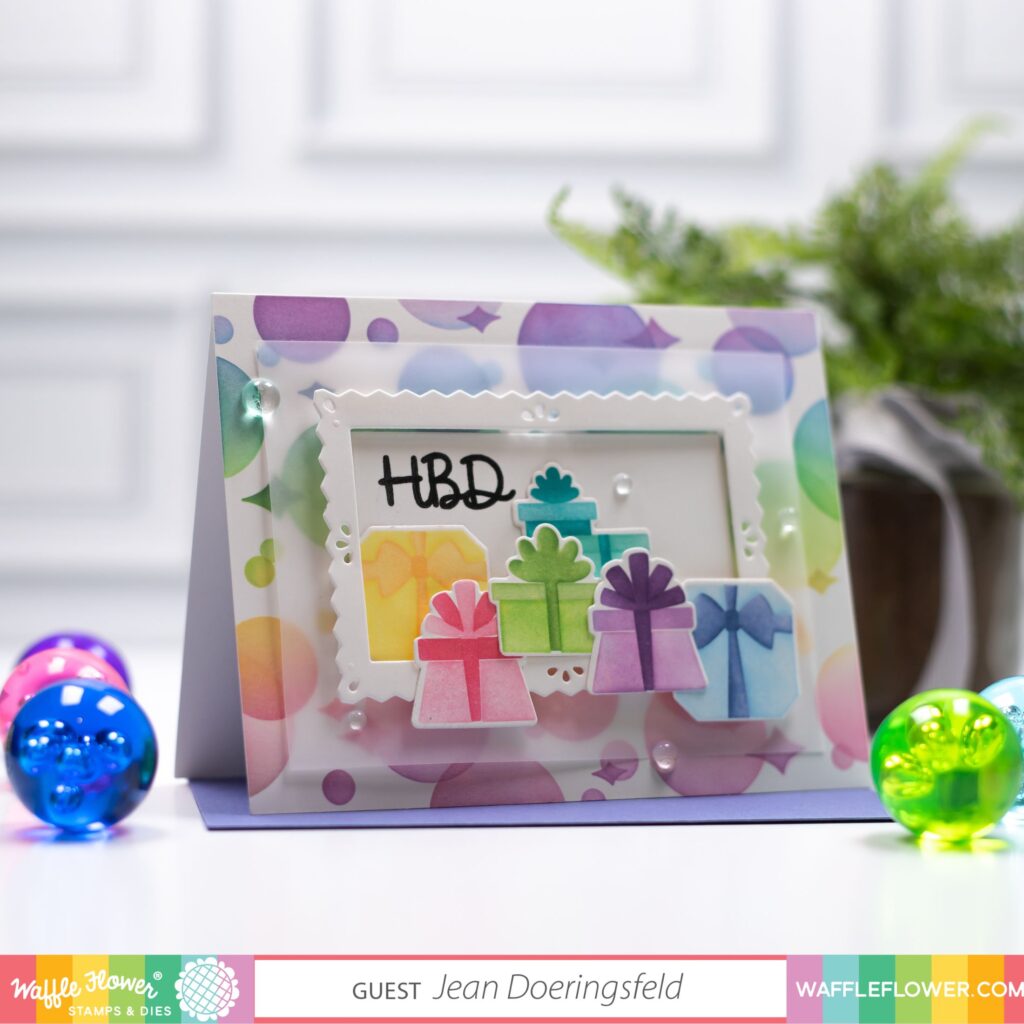
My card for the Party is super colorful (perfect for a party, right?!) and features several items from the new kit, including the Multiple Presents stencil and die set and the Bokeh Stencil Trio. These products are perfect for a birthday or any gift-giving occasion (you could even do them for Christmas)! In my case, I went with the birthday theme because I am low on Birthday cards and I hate running out!
To make this card:
- Ink-blend a 4.25 x 5.5 inch panel using the Bokeh Stencil Trio. I used several colors of the rainbow on each stencil layer – being careful to go in rainbow order so I didn’t get “muddy” colors where they overlap.
- Adhere the panel to your card front and set aside.
- Ink-blend the Multiple Presents stencil TWICE – using a light hand for the bottom layer, then getting gradually darker for the others. I did this twice with different colors so that I would have enough presents for my card and could get a lot of variation in the colors. By ink-blending light-to-dark on the layers, you will get monochrome-colored presents and will still have definition between their parts. Note that I used a peach color for the bow on my yellow present because I couldn’t get the yellow dark enough for my preference. You could certainly mix up the colors of your layers and get an amazing look – that just wasn’t the look I wanted for this card.
- Die cut the presents.
- Die cut a Pinking Rectangle Frame – keeping the cut-out section.
- Stamp your greeting in the upper left corner of the frame cut-out.
- Cut a piece of vellum to 3.75 x 4.75 inches.
- Glue the vellum to your card front making sure to only put glue in the middle (otherwise you’ll see the glue through the vellum.
- Adhere your frame to the card front using foam adhesive.
- Adhere the cut-out sentiment piece into the frame using tape runner or liquid glue..
- Arrange and adhere your presents to the frame. I put some inside the frame and some on top of the frame. For those on top of the frame you may need to use foam adhesive to keep them stable.
- Add a few gems for shine.
I hope you like this card and that it inspires you to create something today! I can’t wait to see what you make with this kit (and any of the others)!
For even more inspiration, be sure to head over to the Link Party and check out what other designers have made using this kit. Pssst: you’ll have more chances to win the GIVEAWAY if you visit and comment on their blogs too!
Have a wonderfully creative day!
")


Such a fun and festive birthday card, Jean, but also see how versatile the dies and stencils are. Thanks for the chance to win!
This is such a fun card, I love it and love this sneak peak. I love waffle flower products and don’t have very many. Your card is so beautiful!
Fantastic card. Love the “bubbles”
in the background – speak party.
The vellum tones them down.
thanks for sharing.
This is a beautiful card! I love seeing all of the ways this kit is being used. Thank you for the inspiration.
I like the bokeh background you created for these sweet presents.
Love this card! So cute!
Love this creative, colorful, festive-looking card design! The gifts and bubbles / balloons are so cheerful!
Love your card. So pretty
Oh Wow what a fantastic card! Love all the details 🤩
😍 the way your framed your card !
Beautiful colors and the kit looks so fun.
I absolutely love these colors, the card is beautiful. I would love to win this kit.
I love how you created all the texture on your card. The layered colors look amazing.
Beautiful card and colors used! Would love to get this in the mail for my birthday!
I love your card and the colors you chose. Such a happy card that anyone would love receiving!
Wonderful card..really like how you used these stencils.
What a beautiful card! I love all the dimension! Thanks for sharing!
What a great design. Anyone would love such a cheerful card.
Fun card!
Pretty birthday card! Love the bokeh background and the presents! Awesome colors, vellum layer and frame too!
Such a great card! Love the vellum, makes the frame and gifts pop!
What a fun card! Perfect colors for a party. I have been playing with stencils lately and love them. Will have to add that bokeh one so versatile!
Such an adorable card! Love the colors.
Thanks for sharing.
Such a gorgeous, colorful card! Thanks for sharing.
Jean, I love your card…. I love how you used the colors for your presents and then used the same colors for background using the Bokeh stencil…..
Super cute!!
This card is adorable! I love the pastels and the fun background. Great new kit!
Your card is beautiful. New to your blog. I love how you list everything you used showing a picture and the link.
So cute! I really like your background stenciling!
What a great card! I love the background and the dimension with the frame and presents is great 🙂
I love your card! Beautiful!!
This card screams HBD with every aspect. This kit is a must have if cards like this can be made so beautifully.
So colorful and cute!!!
Adorable… I absolutely love it ❤️
Love your cards! Keeping the color scheme together makes it so beautiful!
What a beautiful and fun design! I love all the rainbow colors and the cool background!
Such a cute card!
Terrific birthday card!!
So adorable!