

Hi there!
I have an exciting new DieCember® announcement today, along with a fun project to share!
Simon Says Stamp and Tim Holtz Sizzix have teamed up with an adorable exclusive die set to celebrate DieCember®! This is a limited edition die set and guess what? It’s a free gift with the purchase of $25 of Tim Holtz product at Simon Says Stamp (available while supplies last)!!! How fun!
This die set features an adorable Santa and the cutest snowman. I just love the icon-style and size of these dies because they are perfect for so many projects. So today, I’m sharing with you a fun tag pocket (and a few tags) that I created using this set and a few other products from the latest Simon DieCember® release.
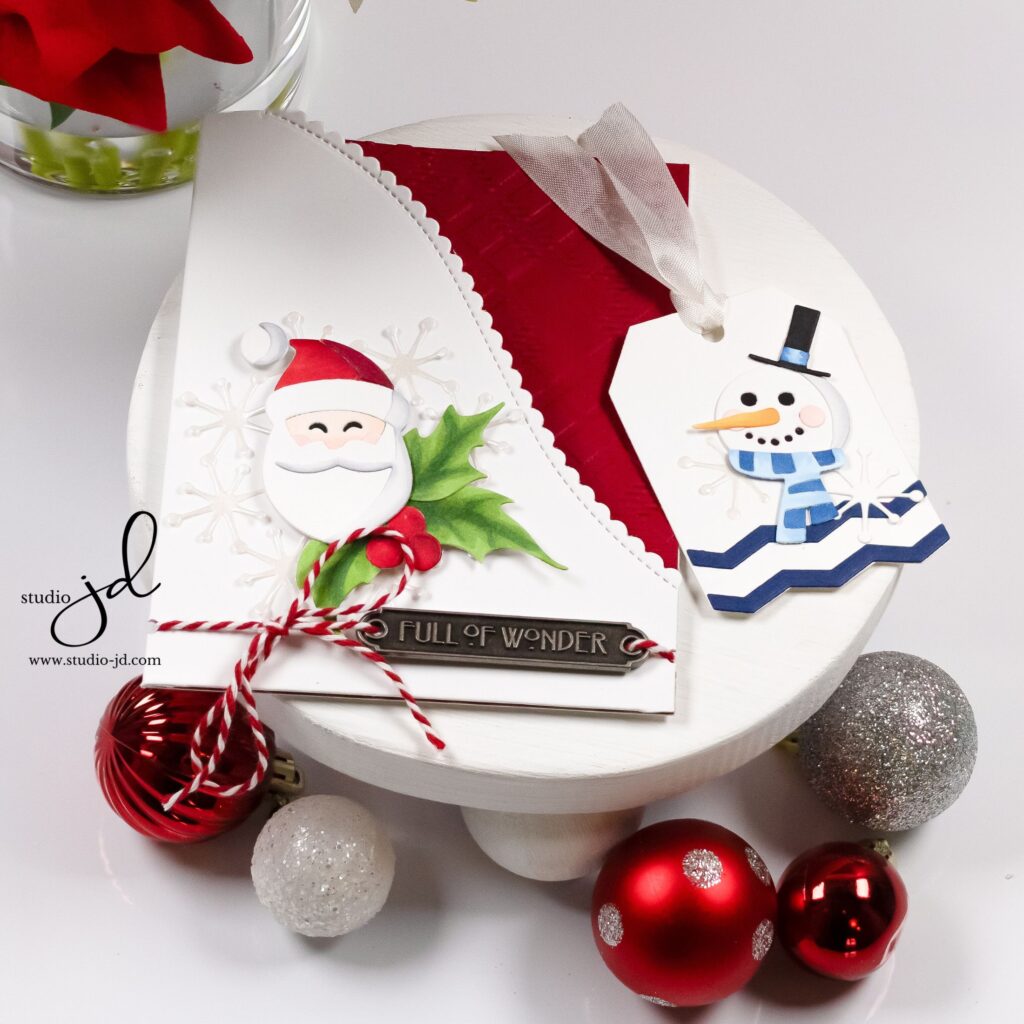
I used a side-folding A2 card base for this project and, after making the pocket, the size of the project is approximately 4 x 5 ¼ inches. This size is perfect for a tag pocket but would also work well for a hot cocoa packet, seed packet, or other small gift.
I used an edge/border die to create the sweet stitched scalloped edge at the top of the pocket, then used an embossing folder to create a plaid pattern on red cardstock for the exposed inside of the pocket. Once those were ready, I scored and trimmed the bottom and right sides of the front cover of the card base at ¼ inch and used heavy duty adhesive to form the pocket.
With the pocket created, I die cut 3 tags and set them aside.
I die cut all the pieces from the Tim Holtz Sizzix die set, used my Copic markers to color them, and assembled them with liquid glue. I also die cut, colored, and assembled a few other pieces from some of the other DieCember® release products (all products are linked below).
With all the pieces ready to go, I laid out the design for the front of the pocket and each of the tags, then adhered everything in place with either liquid glue or foam adhesive.

I decided I wanted to add one of Tim Holtz’s metal word plaques to the front of the pocket. To keep the metal plaque in place, I used a small hole punch to punch tiny half circles in the left and right edge of the pocket. That way, when I wrapped my baker’s twine around the pocket and through the plaque, the twine fit into those little half circles, and it kept the plaque and twine from sliding up and down. I also used some glossy accents to adhere the plaque itself to the pocket.
This tag pocket turned out so cute and was so much fun to create! I hope you like this project and that you’ll follow along all month while we celebrate die cutting and all things crafty! And don’t miss out on the exclusive Tim Holtz Sizzix DieCember ® products!
Have a wonderfully creative day, everyone!

0 Comments