

Hi everyone!
I’m back from a wonderful vacation road tripping to Montana and South Dakota. It was a glorious trip and just what I needed to replenish my reserves and infuse myself with some new creative energy! I truly hope you get to take some time and enjoy the summer, too!
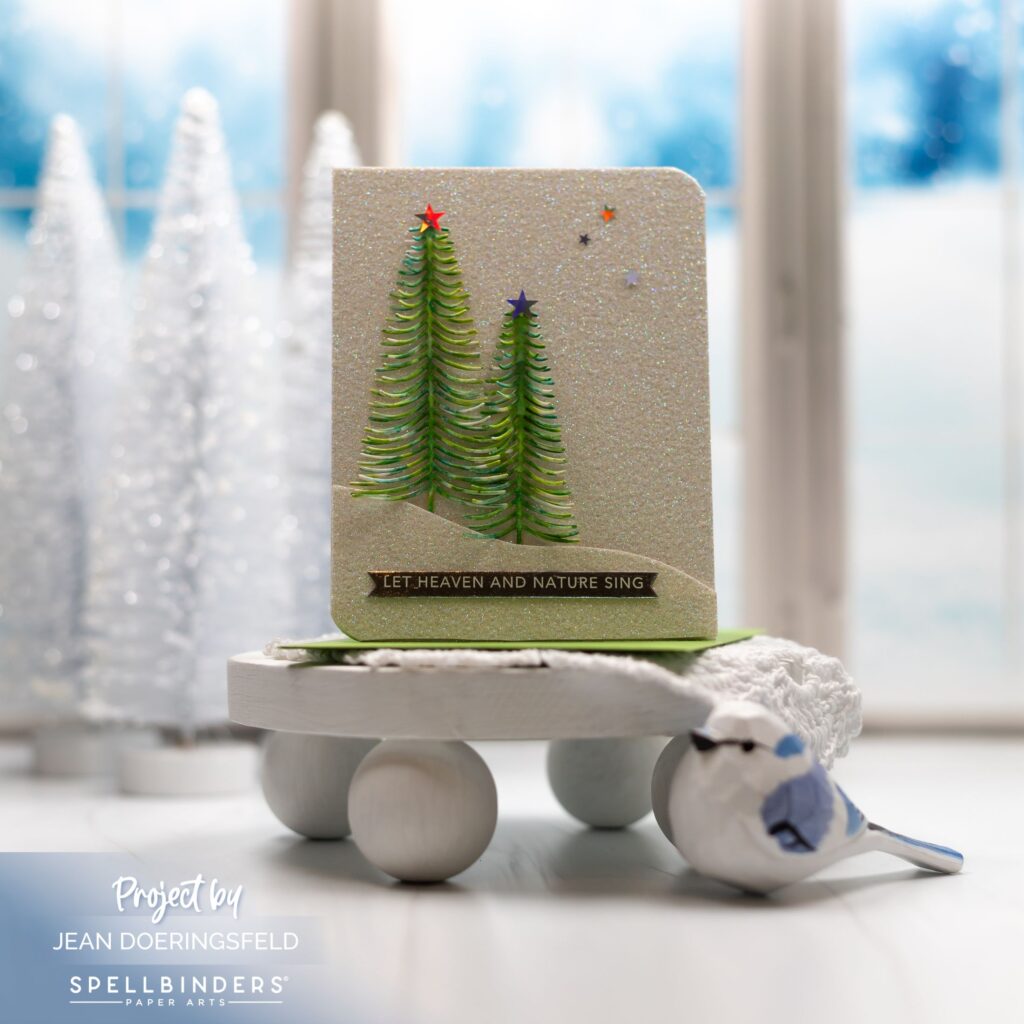
I was gone for most of the “Christmas in July” celebrations, so I hope you don’t mind that I’m a little late to the game sharing this classically glam Christmas card.

This card is super, super simple but really impactful and full of dimension and endless sparkle. The pictures really don’t do it justice!
To make this card:
- Die cut each of the bottle brush trees twice out of white watercolor cardstock.
- Use the smooshing technique and a water brush to add 3 shades of green color willy-nilly to each of the trees. If you are new to the smooshing technique you will love it: just smoosh your ink pad onto a non-porous surface (I used my glass mat), then add a drop or two of water and use your water brush like a paint brush to add the ink to the die cuts. You’re basically using your inks as watercolor paints! Super easy!
- Set the bottle brush trees aside to dry.
- Cut a piece of glitter cardstock to the full size of a card front (4.25 x 5.5 inches) and adhere it to a card base.
- Round the upper right and bottom left corner (optional, but I think it adds a nice touch).
- Cut another piece of the same glitter cardstock to be 4.25 inches by about 2.5 inches, then cut out a snowbank form across the top.
- Pop the snowbank up on your card base using foam adhesive – just be sure to leave a little room at the very top so you can tuck your trees in behind the snowbank.
- Once the trees are dry, glue the two layers together with a thin line of glue only up the center of the tree – do not apply glue to the branches of the trees or you will not get the dimension you want for the card.
- Adhere your trees to your card front by tucking in the trunk of the tree behind the snowbank.
- Gently pull up the top layer of branches on each tree to get a full bristled bottle brush look.
- Add your sentiment to the bottom of the card. I used a sentiment strip that I foiled in silver but you could use any sentiment you like.
- Add a few stars for even more glam!
I hope you enjoyed this project and that it inspires you to take a vacation (or start making Christmas cards) LOL! Let me know in the comments what you have on your summer vacation list!
Have a wonderfully creative day!

Love these pretty trees and the sparkle!
Thank you so much, Denise!